![]()
![]()
![]()
![]()
RENAULT ALPINE GTA
Nosecone Removal
by Nic Lyons
1. To gain access to some of the (Torx) screws holding the nosecone in place you will first need to remove the front bumper.
2. Once you have done this, open the bonnet and remove the rubber seals. Next, remove the main (front) trim. This just 'sits' in place and although some jiggery-pokery around the bonnet gas struts is required you shouldn't need to remove them.
3. Unclip the hooks on the rubber strap holding the screenwash reservoir in place. Despite appearances this can be removed by pulling it gently towards the back of the car. There is sufficient length in the wiring and water pipes not to have an accident in either department!
4. Remove the 3 newly-revealed nuts and washers securing the upper centre edge of the nosecone to the tub.
6. Remove the horizontal T30 Torx screws (1-per side) securing the headlight plate to the indicator unit
7. Detach their connectors and remove both headlight assemblies. Each of these comprises two lamps secured to a metal plate with 2 small bolts (7mm head) and 3 equally small nuts. The assemblies - especially the left-hand one - need some persuasion out of their corners. Be patient and make sure the plate is not fouling on any of the three fixings along its lower edge.
8. Remove the front indicators. First remove the bulb by twisting its carrier anti-clockwise. Then pull firmly on the metal clip on the back on the unit in an upward direction. You may find it useful to use the handle of a screwdriver of similar to avoid hurting yourself.
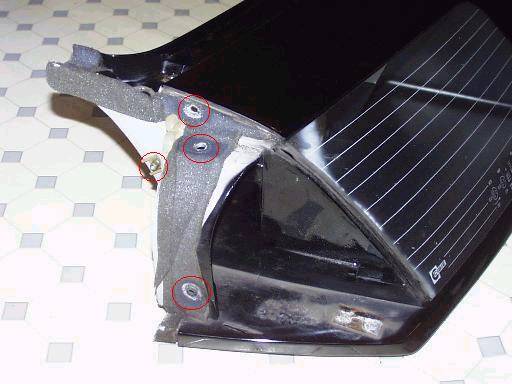
9. Once the indicators are removed 2 more T30 screws will be revealed (each side). Remove them - and the very-easy-to-miss T30 screws (1 each side, accessible from inside) securing the upper outside edges of the nosecone to the upper front corners of the wings. I've included a photo so you can see the locations of these fasteners.
10. Remove the five T30 screws along the top of each wing - and the lower front wing retaining screws. Remove the upward-pointing Torx screws holding the lower edge of the nosecone to the front of the tub. These may not all be in place - I found that screws in the vicinity of the headlight covers were missing. Presumably that's because if you try to install them they will crack the covers! Ease the front of the wing (where it overlaps the nosecose panel) free - having first cut the mastic as appropriate.
11. Cut the lower front and sides of the nosecone free from the tub using a Stanley knife or similar.
12. Ease the nosecone free of the tub - starting at a corner where it joins the wing. Make sure that the fittings for the rubber bonnet rests don't foul on the corresponding holes in the wings as the nosecone is removed.