D651WEY

A place to showcase your pride and joy

Moderators: eastlmark, BIG_MVS, Test Moderator

User avatar
User

mogster242

Rank

Non Member

Posts

556

Joined

Mon Apr 19, 2010 9:13 pm

Location

Bournemouth


Has thanked: 20 times
Been thanked: 6 times

Re: D651WEY

Postby mogster242 » Wed Oct 29, 2014 11:43 pm

Removed battery tray to treat the surface rust...

Underneath the tray, a very clean earth connection :D

DSC_0134.JPG


No wonder the electrics are so reliable on this car...

Now question, how do I take those off?

DSC_0040.JPG


I have replacement thingies (sorry don't know what they're called) at the end but need to remove those knackered ones first and they don't look like they want to move..
You do not have the required permissions to view the files attached to this post.
1989 GTA V6 Turbo Grey
Megane R26 F1
Clio 197
User avatar
User

clee

Rank

Non Member

Posts

10431

Joined

Fri May 28, 2004 11:58 am

Location

Derbyshire


Has thanked: 54 times
Been thanked: 104 times

Re: D651WEY

Postby clee » Thu Oct 30, 2014 7:52 am

Nice one Ced .Track rod ends ,they normally unscrew fairly easily .There are flats on the end of the arm right next to the nut so two spanners ,one hold the arm end, the other on the nut and once you break it they will just spin out .
User avatar
User

Miles

Rank

Non Member

Posts

725

Joined

Thu Apr 14, 2005 9:06 am

Location

Hampshire


Has thanked: 34 times
Been thanked: 10 times

Re: D651WEY

Postby Miles » Thu Oct 30, 2014 9:13 am

Be easier if you reattach hub first and loosely fit ball joint. Plus soak in plus gas and heat. Also count the threads off so you can refit new ones in roughly the correct place. While your there check steering gaiters, might be advisable to replace too!
User avatar
User

mogster242

Rank

Non Member

Posts

556

Joined

Mon Apr 19, 2010 9:13 pm

Location

Bournemouth


Has thanked: 20 times
Been thanked: 6 times

Re: D651WEY

Postby mogster242 » Thu Oct 30, 2014 7:56 pm

Thanks guys, will give it a go shortly..
Got some nice shinny ones from RATS to put on ;) :up :wave
1989 GTA V6 Turbo Grey
Megane R26 F1
Clio 197
User avatar
User

mogster242

Rank

Non Member

Posts

556

Joined

Mon Apr 19, 2010 9:13 pm

Location

Bournemouth


Has thanked: 20 times
Been thanked: 6 times

Re: D651WEY

Postby mogster242 » Mon Nov 03, 2014 10:58 pm

Hi guys,
Any suggestions on how to undo a rounded off star head screw that holds a brake disc?

DSC_0305.JPG


Cheers
You do not have the required permissions to view the files attached to this post.
1989 GTA V6 Turbo Grey
Megane R26 F1
Clio 197
User avatar
User

clee

Rank

Non Member

Posts

10431

Joined

Fri May 28, 2004 11:58 am

Location

Derbyshire


Has thanked: 54 times
Been thanked: 104 times

Re: D651WEY

Postby clee » Tue Nov 04, 2014 7:35 am

soak, then try to tap it round with a sharp point .Failing that you'll have to drill it out .
User avatar
User

JohnC

Rank

Non Member

Posts

2120

Joined

Sun Dec 02, 2007 6:19 pm

Location

Jersey C.I.


Has thanked: 15 times
Been thanked: 83 times

Re: D651WEY

Postby JohnC » Tue Nov 04, 2014 9:45 am

mogster242 wrote: Any suggestions on how to undo a rounded off star head screw that holds a brake disc?

Tip 1.
Before ever attempting to undo these brake disc screws, get hold of a parallel punch just a bit smaller than the diameter of the screw head, and give the it a couple of smacks with a hammer.

Tip 2.
If you have torx bits ..... the type that fits into a holder. ..... get hold of the next size up and you might be able to hammer it into the damaged socket in the screw. I have used this method before and because the screw head is competitively soft compared to the Torx bit, it worked for me.
Worth a try. ;)
1990 GTA Atmo, 2003 Jaguar X type 2.5SE Auto, 2018 Kia Picanto GT-Line-S 1.25
User avatar
User

mogster242

Rank

Non Member

Posts

556

Joined

Mon Apr 19, 2010 9:13 pm

Location

Bournemouth


Has thanked: 20 times
Been thanked: 6 times

Re: D651WEY

Postby mogster242 » Tue Nov 04, 2014 12:42 pm

Thanks guys, will give it a try....
unfortunately that's the biggest torx bit I have... might have to borrow one...
that's typical really, the other 7 came out without much effort... :crazy
1989 GTA V6 Turbo Grey
Megane R26 F1
Clio 197
User avatar
User

Miles

Rank

Non Member

Posts

725

Joined

Thu Apr 14, 2005 9:06 am

Location

Hampshire


Has thanked: 34 times
Been thanked: 10 times

Re: D651WEY

Postby Miles » Tue Nov 04, 2014 2:30 pm

Cedric,
Impact driver but if that fails just drill it, the head will fall off.
This will allow you to remove disc as well as get hold of more thread with some mole grip pliers.
It is not structural you don't have to refit it just helps align wheel nuts.
But it's best to keep if you can, you may be able to get to the back of the screw for more plus gas too.

Dave
User avatar
User

JohnC

Rank

Non Member

Posts

2120

Joined

Sun Dec 02, 2007 6:19 pm

Location

Jersey C.I.


Has thanked: 15 times
Been thanked: 83 times

Re: D651WEY

Postby JohnC » Tue Nov 04, 2014 4:31 pm

.. ..... get hold of the next size up and you might be able to hammer it into the damaged socket in the screw.


PS. TIP 3.

If you do go down this route .......... once the larger bit is jammed into the rounded off Torx socket, do not use a small ratchet lever, or other means where by sideways pressure is applied to the Torx bit. Use a small socket and T Bar, ..... By using the T Bar, you will only apply rotary motion to the Torx bit and there won't be any sideways levering which tries to lever the bit out of its socket and in doing so damages the mating surfaces.
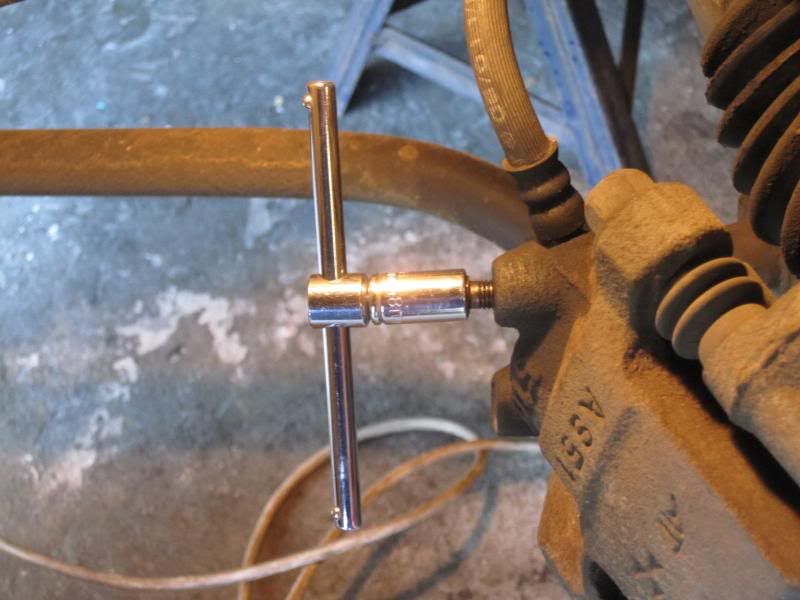
The same principle applies when unscrewing bleed nipples. I always crack them first with a socket and T Bar. If a small spanner is used there is a high degree of shearing motion which, if the nipple is tight, tends to lead to a sheared nipple.
Below is a pic of what I do when cracking a bleed nipple. This was on my Sirion and the nipples where tight but with this method there was a loud crack when they released, and they then unscrewed without damage.
I know that a bleed nipple is not quite the same, but the basic principle applies to tight Torx screws.

Image
1990 GTA Atmo, 2003 Jaguar X type 2.5SE Auto, 2018 Kia Picanto GT-Line-S 1.25
User avatar
User

Miles

Rank

Non Member

Posts

725

Joined

Thu Apr 14, 2005 9:06 am

Location

Hampshire


Has thanked: 34 times
Been thanked: 10 times

Re: D651WEY

Postby Miles » Tue Nov 04, 2014 5:22 pm

Good tip john,
on aircraft we had a special removal tool.
Basicaly it was a lever you screwed one end into a good thread(in this case either the other disc bolt fastening screw or a wheel nut thread, the socket and torq part was then on a sliding rail. With a hand lever at the other end.
This then enabled you to apply a lot of downward pressure and simple undo the stubborn screw. Our ASTE (Aircraft specific type equipment) tool was called a Sgt Fletcher no doubt the guy who built the first home made version. Used mainly for removing tri wings. Later we had a boeing specific tool which cost thousands and was only slightly better than our own creations. Below is a pic of a similar tool found on the net.
You do not have the required permissions to view the files attached to this post.
Last edited by Miles on Tue Nov 04, 2014 11:34 pm, edited 1 time in total.
no avatar
User

Custard

Rank

Non Member

Posts

790

Joined

Sat Oct 12, 2013 7:02 pm


Has thanked: 1 time
Been thanked: 35 times

Re: D651WEY

Postby Custard » Tue Nov 04, 2014 7:55 pm

You will be amazed how the most things come loose by heating the outer part first.
User avatar
User

mogster242

Rank

Non Member

Posts

556

Joined

Mon Apr 19, 2010 9:13 pm

Location

Bournemouth


Has thanked: 20 times
Been thanked: 6 times

Re: D651WEY

Postby mogster242 » Tue Jun 02, 2015 10:50 pm

well, it's been a very long time since i updated this thread... done some work though :D
although admitedly i didnt do much during the cold months....

so eventually got that torx bolt out, took the front wishbones, hubs etc off, refurbished and back in....

DSC_0702.JPG


DSC_0719.JPG


New clio discs

DSC_0777.JPG


then refurbed some peugeot 406 coupe calipers

DSC_1033.JPG


DSC_1035.JPG
You do not have the required permissions to view the files attached to this post.
1989 GTA V6 Turbo Grey
Megane R26 F1
Clio 197
User avatar
User

mogster242

Rank

Non Member

Posts

556

Joined

Mon Apr 19, 2010 9:13 pm

Location

Bournemouth


Has thanked: 20 times
Been thanked: 6 times

Re: D651WEY

Postby mogster242 » Tue Jun 02, 2015 11:00 pm

The problem with those calipers is that they are a lot deeper than the original and the wheels i had wouldn't fit without any spacers and with a 20mm spacers would stick out of the arch too much... shame coz i really like those wheels...

DSC_1130.JPG


luckily i had a spare set of wheels that i intented to use with track tyres that fit OK with 10mm spacers and just about fit in the arches.... that will do for now...

IMG-20150519-WA0002.jpg


IMG-20150517-WA0020.jpeg


they should look good.... only problem is that they are very open so the calipers are very visible... which means that i have to refurb the rear calipers too so they dont look rubbish... :hang
You do not have the required permissions to view the files attached to this post.
1989 GTA V6 Turbo Grey
Megane R26 F1
Clio 197
User avatar
User

mogster242

Rank

Non Member

Posts

556

Joined

Mon Apr 19, 2010 9:13 pm

Location

Bournemouth


Has thanked: 20 times
Been thanked: 6 times

Re: D651WEY

Postby mogster242 » Tue Jun 02, 2015 11:15 pm

replaced the 1 radiator fan with 2 new ones

DSC_0771.JPG


DSC_0773.JPG


And back in... made a few brackets and fitted the charge cooler rad too

DSC_1797.JPG


DSC_1798.JPG


now will have to fit the air deflector thingy back in to direct the air flow onto the rads.

to improve the air flow / cooling, i decided to open the front bumper and relocate the number plate

DSC_1796.JPG


DSC_1793.JPG


to do this i also had to cut the inner bumper, so made a bracket to keep the strength

DSC_1794.JPG


hopefully that will help keeping the temp down a bit...
You do not have the required permissions to view the files attached to this post.
1989 GTA V6 Turbo Grey
Megane R26 F1
Clio 197
PreviousNext


  • Advertisement

Who is online

Users browsing this forum: No registered users and 86 guests

Powered by phpBB ® | Renault' and 'Alpine' are trademarks of Renault S.A.S. or its subsidiaries and are used with kind permission of Renault France