Martin’s PRV bone yard…

A place to showcase your pride and joy
no avatar
User

dallarax19

Rank

Non Member

Posts

99

Joined

Tue Oct 30, 2012 1:44 am


Has thanked: 0 time
Been thanked: 1 time

Re: Martin’s PRV bone yard…

Postby dallarax19 » Tue Sep 03, 2013 1:34 am

I have an old school question for the 2664 head, how much material can I remove before hitting the water jacket??? Is it close or is there alot of meat to work with? I would like to get a straight shot for the flow.
Image.
Image
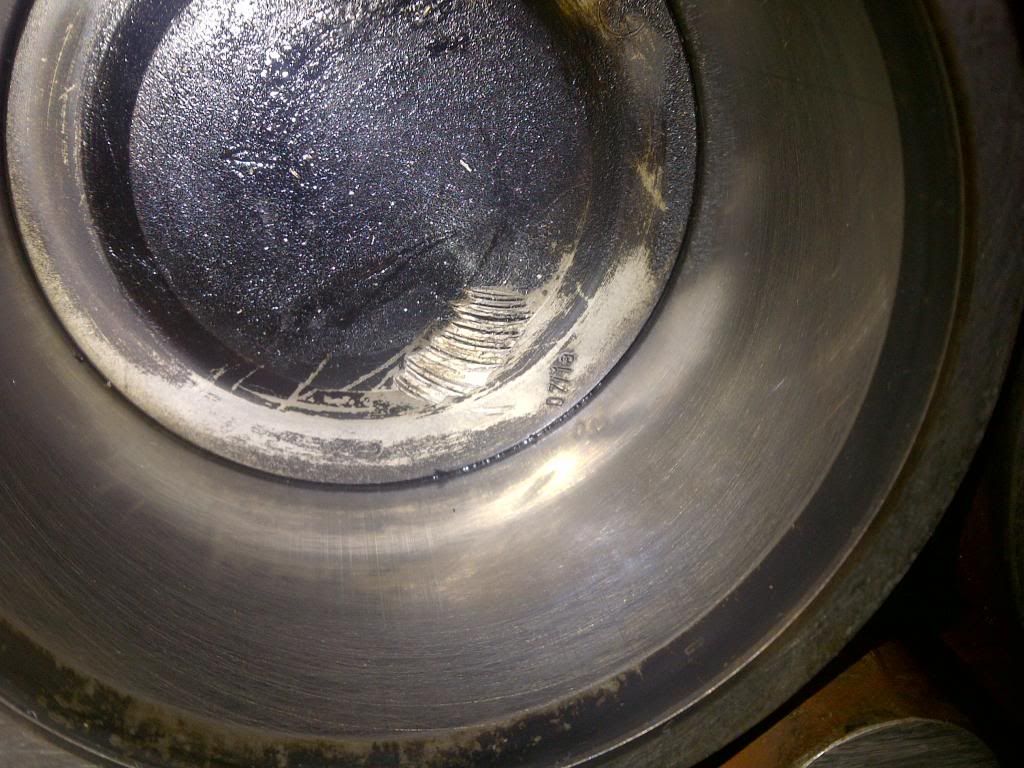
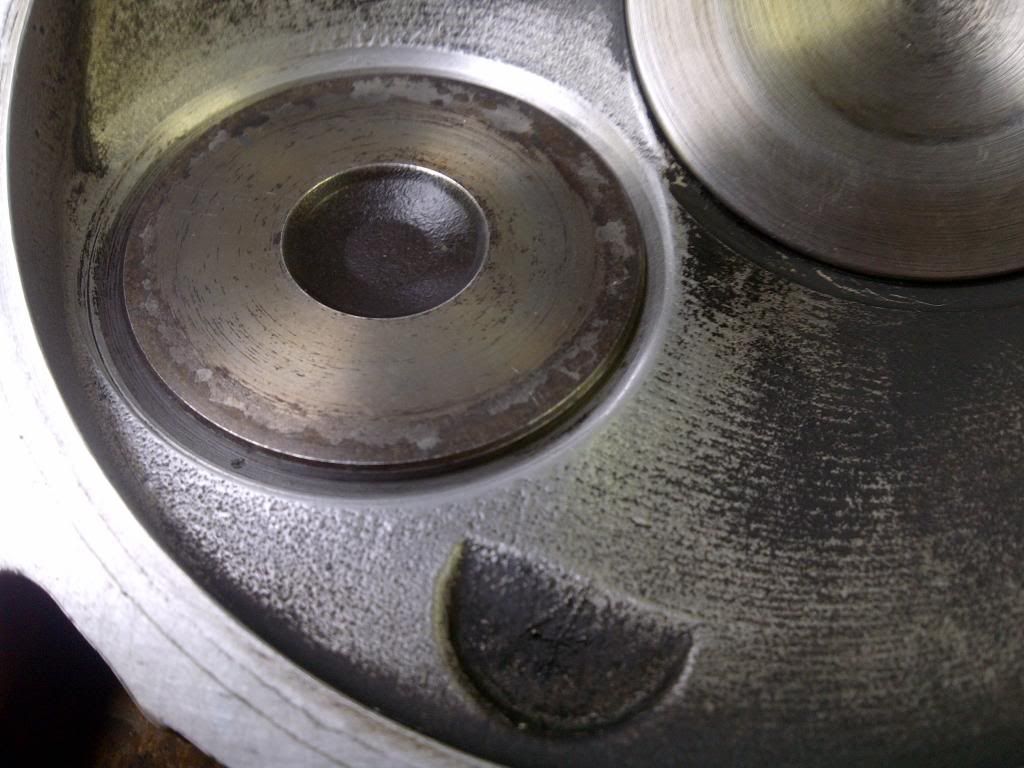
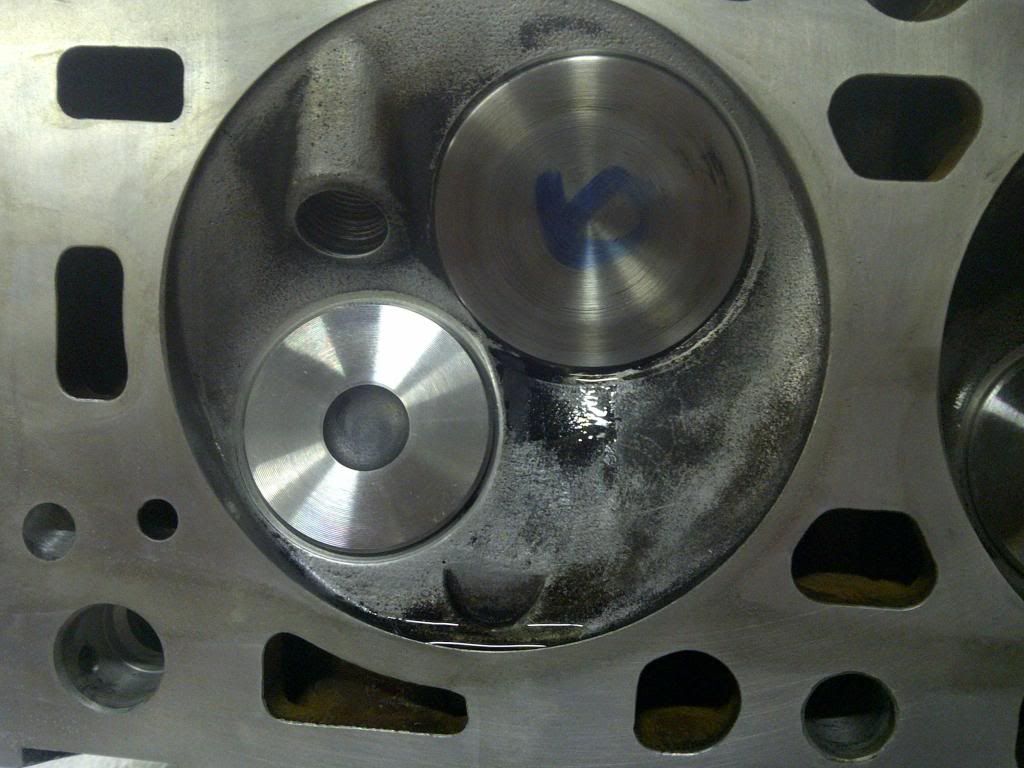
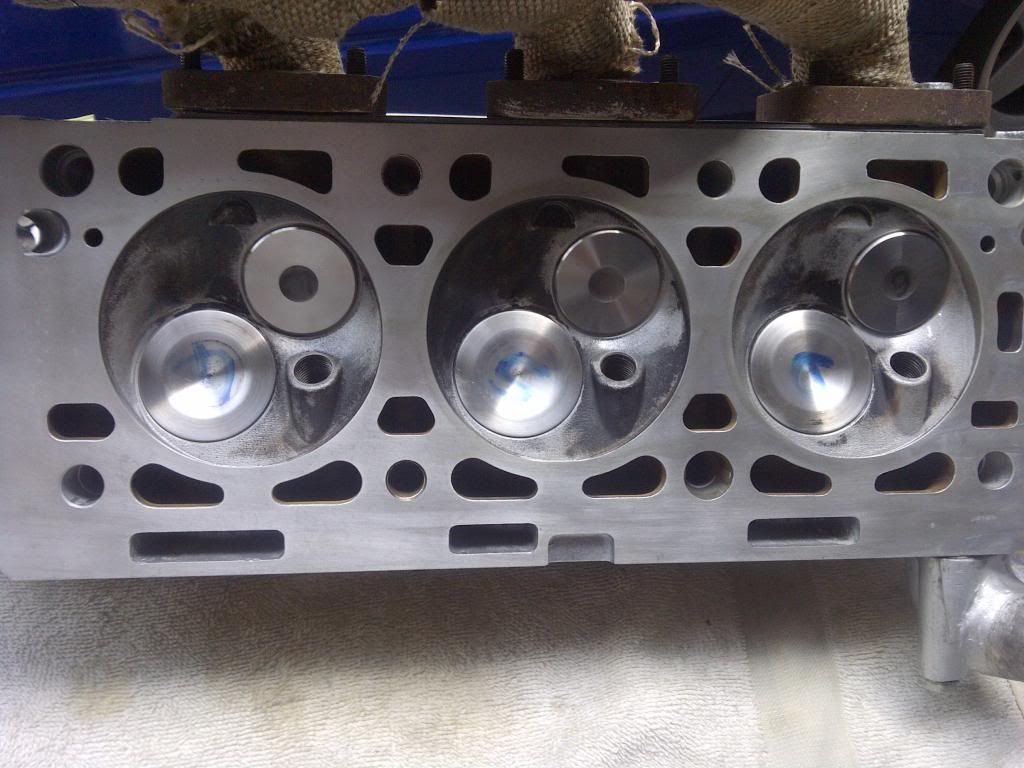
So far the rough shaping is going well but I don't want to go too far. I could use some info on this.
no avatar
User

dallarax19

Rank

Non Member

Posts

99

Joined

Tue Oct 30, 2012 1:44 am


Has thanked: 0 time
Been thanked: 1 time

Re: Martin’s PRV bone yard…

Postby dallarax19 » Wed Sep 04, 2013 8:39 pm

Anyone have a section cut of an old head or have lead to a link? I am looking for an actual sectioned head not a section cut from a drawing.

Thanks!
no avatar
User

MFaulks

Rank

Non Member

Posts

1552

Joined

Sun Sep 28, 2008 4:25 pm


Has thanked: 45 times
Been thanked: 26 times

Re: Martin’s PRV bone yard…

Postby MFaulks » Fri Sep 06, 2013 10:50 pm

.
Hi Brian,

Sorry not had much time of late... I do have sectioned heads, and ones where I have deliberately cut for wall thickness. I will check as soon as I can, but do bear in mind they do vary some what - head to head, but port to port as well sometimes. Right where your writing is, if you like on the face where the guide boss runs down into the port runner is where you are most likely to break through as there is a water pocket under there; looking at yours you have gone already as far as I would feel comfortable- to slightly uncomfortable, having been there a few times. If you are in a rush, get someone to have a probe around with an ultrasonic thickness measure. Alternatively buy one, they are very handy for this kind of thing, just need the smaller 90deg head. These instruments are quite cheap these days… worth considering..

Cheers,
Martin
... A diamond is only a piece of coal that did well under pressure... PRV afflicted, may be I need to squeeze harder!!!!

https://www.facebook.com/maftecfaulks
no avatar
User

dallarax19

Rank

Non Member

Posts

99

Joined

Tue Oct 30, 2012 1:44 am


Has thanked: 0 time
Been thanked: 1 time

Re: Martin’s PRV bone yard…

Postby dallarax19 » Sat Sep 07, 2013 12:25 pm

Hey Martin,

Thanks for the reply. My sense was the same that I have pushed it to the limit. I like the ultrasonic check but am not familiar with an affordable tool, do you have one that you recommend? That would be very handy for sure. Every time I say "I don't think I will do another performance engine" I find I am lying to myself. Now to clean up the port surface and make the other 5 the same way.
no avatar
User

MFaulks

Rank

Non Member

Posts

1552

Joined

Sun Sep 28, 2008 4:25 pm


Has thanked: 45 times
Been thanked: 26 times

Re: Martin’s PRV bone yard…

Postby MFaulks » Sat Sep 07, 2013 2:28 pm

.
Yep, doing the one is always fun, doing the step repeat is always the chore and difficult bit exactly replicating the shapes. Right, I had forgotten I still had a head here at home on my flow bench with the core plugs out. Total thickness 7mm, so I would stay to around 2-3mm max pulled out of that side wall as you will be cutting across the top of a convex curve with a flat.

I hope that helps.
Regards,
Martin
... A diamond is only a piece of coal that did well under pressure... PRV afflicted, may be I need to squeeze harder!!!!

https://www.facebook.com/maftecfaulks
no avatar
User

dallarax19

Rank

Non Member

Posts

99

Joined

Tue Oct 30, 2012 1:44 am


Has thanked: 0 time
Been thanked: 1 time

Re: Martin’s PRV bone yard…

Postby dallarax19 » Sun Sep 08, 2013 1:59 am

By the way Martin I am most impressed you tuned into that detail. I got a bit overzealus with the valve guide lead in, gotta be really thin for sure.
Port #1 - did not check with the template early enough, a bit too much gap to the template
Image
Image

Port#2 - Right to plan
Image
Image
Image
no avatar
User

MFaulks

Rank

Non Member

Posts

1552

Joined

Sun Sep 28, 2008 4:25 pm


Has thanked: 45 times
Been thanked: 26 times

Re: Martin’s PRV bone yard…

Postby MFaulks » Sun Sep 08, 2013 6:29 am

.
Brian,

Yep, I know them by sight, but you are going to need to tempt fate and have a little poke at it with a slightly blunted scriber... heart stopping moment I know. I would also have the head pressure tested to be sure. It's a critical area for valve guide support, so best bet is check. The other thing is some of the castings have a high degree of inclusions and they can give you a near heart attack on the spot when they start opening up, curiously nearly always on the exhaust side. So far I have found they don't propagate fortunately, and can either leave or grind past if you are not already up to the limit, again the pressure test is your friend. You might be ok... but do check it, and as you say go a little safer on the others.

Otherwise they look great. I meant to ask, what school of thought are you applying - gulp or velocity. Really depends what sort of headers you are going to be using too.

Cheers,
Martin
... A diamond is only a piece of coal that did well under pressure... PRV afflicted, may be I need to squeeze harder!!!!

https://www.facebook.com/maftecfaulks
no avatar
User

dallarax19

Rank

Non Member

Posts

99

Joined

Tue Oct 30, 2012 1:44 am


Has thanked: 0 time
Been thanked: 1 time

Re: Martin’s PRV bone yard…

Postby dallarax19 » Sun Sep 08, 2013 12:32 pm

I will do a pressure check. I have been tapping the area to see if I could get an audible read but I could not hear anything. You may remember my Fiat head failed after 20years of service with a crack in the intake port from a thin section. After it was repaired I built a plate to pressure check it. I will do similar for his head. You asked a question I am not familiar with. I am porting for velocity and working on the cross sectional Area of the Q=VA equation. I am using the sim my buddy Brad and I did earlier in the year as the basis for what I am doing. I am not familiar with "gulp"; what is that? I have the standard A310 headers
Image
I did not measure the length but the tube ID is 36.25mm the port is matched to the gasket at 35mm. The length seems short to me for a lower rpm redline engine but there is only so much packaging space. The collector is pretty standard and does not have an internal merge bullet. Anyway I am curious about this topic.

One thing I was meaning to ask about was the ridge right behind the valve seat aournd the perimeter in the port. Why is this there, is it for reversion? It is very odd to me. I have always left a step at the port exit at the head to header interface. I thought at first it was an odd fitting seat but was surprised it was actually in the aluminum and not the stainless. If you know what this is I would appreciate the feedback.
no avatar
User

MFaulks

Rank

Non Member

Posts

1552

Joined

Sun Sep 28, 2008 4:25 pm


Has thanked: 45 times
Been thanked: 26 times

Re: Martin’s PRV bone yard…

Postby MFaulks » Sat Sep 14, 2013 7:22 am

.
Hi Brian,

The step in the exhaust port is pretty ugly, and I can't think of any other way of describing it. As I think we talked on email sometime ago, the port is too low in the head; the short turn is left impossibly tight, and susceptible to heat distortion certainly when pushed in turbo form with the extra heat. So all in all I don't like it much as you may tell. On the long side it does indeed form an anti reversion step, but as you say the normally formed at the header flange. The velocity at that point, and certainly if you maintain velocity in the port and header section as you mention - gas column momentum, then reversion is going to be less an issue - only really two ways to handle it, velocity ie doesn't want to turn, or make the flow lazy and dissipate the energy so it simply doesn't have any energy in either reverse flow or in reversion pulse acting in superposition in the gas column. Why is it there, I think it was the limit of the technology that was being applied in the manufacturing scheme for the heads. Both heads were machined on the same flow line (the inner port moulds are not LH and RH handed as you would have no doubt noticed, they are the same moulds turned 180 deg), and this gives tolerance for a number of arrangements, valve and insert sizes that were fitted without changing the basic port moulding.

You mentioned on another post that you thought the sleeve / wet liner and liner seal arrangements was pants. I disagree on that point, from a production stand point, technology at the time, and a suitable & sufficient performance / cost stand point it made a sensible decision. It does work well, and has and had been used for many years, and was very well known in the PSA engine manufacture process - used from R4's right up the pedigree. Your point on the galvanic corrosion isn't technically correct, as the dissimilar metals need to be in electrical contact with an ion migration path, and this only occurs with the metal shims. Hence why I mentioned them as my least favourite, although they are obviously the most dimensionally (baring the gradual disappearing act - lol) stable of the options. I will say though, the wet liner arrangement as it has been implemented in an open deck for a very high performance engine is somewhat less than ideal...

How's it all coming together? Did you make a cam choice in the end? What duration (off the seat and 50thou), lift at TDC on the inlet, and what lobe centre angles are you looking for out of your simulation? I have 270, and 280 deg profiles as regrinds, 280's are running in the P4 replica nicely. What static compression ratio are you going to end up with?

Regards,
Martin
... A diamond is only a piece of coal that did well under pressure... PRV afflicted, may be I need to squeeze harder!!!!

https://www.facebook.com/maftecfaulks
no avatar
User

dallarax19

Rank

Non Member

Posts

99

Joined

Tue Oct 30, 2012 1:44 am


Has thanked: 0 time
Been thanked: 1 time

Re: Martin’s PRV bone yard…

Postby dallarax19 » Sun Oct 06, 2013 1:06 am

Hey Martin,

OK I bought a second hand Panametrics 22DLHR ultrasonic thickness gauge. I works fine on a control sample but on the head with varying thickness it isn't working at all. How have you got your gauge to work? Before I reassemble the engine I want to be sure it is all good to go. To calibrate the gauge I am using sections of the head that exhibits a constant thickness. All looks good till I try to take a port reading then it doesn't get a reading at all. Let me know how you have done it. It looks like it is a good idea if I can get it to work as expected.

Thanks!
Brian
no avatar
User

dallarax19

Rank

Non Member

Posts

99

Joined

Tue Oct 30, 2012 1:44 am


Has thanked: 0 time
Been thanked: 1 time

Re: Martin’s PRV bone yard…

Postby dallarax19 » Sun Oct 06, 2013 1:35 pm

Not looking good for porting:
http://www.ndt.net/article/wt1097/panam/panam.htm
Has been working great for checking a piston where the walls are concentric. These guys say their system does the job but it is $1550us
http://www.youtube.com/watch?v=ldlA8kN3lZQ
All I can find though is cylinder bore inspection results and comments. Thoughts?
no avatar
User

dallarax19

Rank

Non Member

Posts

99

Joined

Tue Oct 30, 2012 1:44 am


Has thanked: 0 time
Been thanked: 1 time

Re: Martin’s PRV bone yard…

Postby dallarax19 » Fri Oct 18, 2013 1:46 am

Well the ultrasonic gauge worked out OK. I relisted it back on ebay and pocketed an additional $45 above my total costs including shipping. Some updated info on my progress

Stock Valve Spring
#active coils 5.5, total coils 7.25
wire dia = 4.21mm
OD = 30.11mm
ID = 21.59
Free Length = 47.55

Dbilas Valve Spring
#active coils 4, total coils 5.75
wire dia = 3.9mm
OD = 30.94mm
ID = 23.1mm
Free Length = 49.36mm


Lots and lots of time porting
Image

Before
Image

After
Image

Exhaust
Image

A bit more checking
Image
Image

Image

I have to do a final check of each port with the calipers and do some final blending and finally done!
User avatar
User

jon_viola

Rank

Non Member

Posts

1159

Joined

Sun Oct 22, 2006 8:45 pm

Location

Sussex


Has thanked: 4 times
Been thanked: 7 times

Re: Martin’s PRV bone yard…

Postby jon_viola » Fri Oct 18, 2013 10:27 pm

Looks like a top job!!
1989 GTA Turbo
2003 Mercedes E320 CDI Estate- A.K.A Badke Bus

www.badkequartet.co.uk
no avatar
User

MFaulks

Rank

Non Member

Posts

1552

Joined

Sun Sep 28, 2008 4:25 pm


Has thanked: 45 times
Been thanked: 26 times

Re: Martin’s PRV bone yard…

Postby MFaulks » Sat Oct 19, 2013 11:47 am

.
Yep, nice job Brian, just needs to be topped off with a nice seat job and you are there, good stuff. Can you get the heads on the flow bench and get some flow numbers? I think I posted the OE numbers somewhere near the start of this thread, so you can graph the two and post up. Will give you a nice indication of the improvement.

How much have you taken off the height of the short turn BTW, hard to tell by the photo? Which Dbilas cam have you selected to go with this setup then Brian? So what does the engine package include now, cams, matched springs, ported heads on OE valves, free flow headers, and induction?

How are you progressing with the rest of the car, so post engine build you should be back up and running quite quickly? Great, more tuned PRV's hitting the road and making their mark!

Regards,
Martin
... A diamond is only a piece of coal that did well under pressure... PRV afflicted, may be I need to squeeze harder!!!!

https://www.facebook.com/maftecfaulks
no avatar
User

MFaulks

Rank

Non Member

Posts

1552

Joined

Sun Sep 28, 2008 4:25 pm


Has thanked: 45 times
Been thanked: 26 times

Re: Martin’s PRV bone yard…

Postby MFaulks » Sat Nov 02, 2013 10:20 am

.
Well hello peeps, I’m back at it again having been down the work cave for a while… So I have been picking up with various things again. Cams and rocker story I will pick up again soon, but thought you might enjoy the things that I have tried that didn’t work…

But first the damage to my w/shop buddies engine post the dropped exhaust valve thanks to the failed spring picture a couple of pages back. As below, actually not too bad, and opted not to strip the bottom end as the damage was light, the valve guide wasn’t hammered, and the valve was only slightly bent, which obviously went in the bin! I have to say there is definitely a satisfaction in throwing PRV engine parts in the bin that I have not found with other engines! I some how keep all my old Fiat / Lancia engine parts and feel like treasures… but there is a story behind that too… laugh!

Right here goes, in all its ugly history:

Image

Image

Whilst the heads were off, and I had to look at the seats anyway, especially on the hammered exhaust valve, I then checked them out. I found that I was getting seat distortion with heat and loss of seal. I had sunk the seats in a big throat to gain flow without going to a big valve in this set of heads for an experiment ie the larger valve seat, big port with a small valve in the seat. Flowed great as little restriction when it was lifted up out of the way fast, and I had paired up with fast ramp cams to match, but… real life running with real heat loads and stresses other things happen, so to gain the knowledge you have to pay the money and test it… Well I did, and I can say don’t bother, as it doesn’t last…

Image

Image

The coefficient of discharge is great, hence the flow, but as I say it didn’t maintain seal, so you lose VE when it’s hot. Hence, having cut the heads and sunk the cost, I had to fins a way to get it to seal and play with valve head diameters to not completely lose what I had originally set out to gain.. So this is where I got to, and the heads are now back home and happy on the block.

Original size 39mm exhaust valve dropped back in to check seating and then test coeff of discharge, and then worked back from there after a few quick look-see tests to what is seen further down.

Image

Image

So I played with a compromise, valve seat mods and exhaust valve machined to match the detail:

Image

And ended up with this – yum yum…

Image

Image
... A diamond is only a piece of coal that did well under pressure... PRV afflicted, may be I need to squeeze harder!!!!

https://www.facebook.com/maftecfaulks
PreviousNext


  • Advertisement

Who is online

Users browsing this forum: No registered users and 66 guests

Powered by phpBB ® | Renault' and 'Alpine' are trademarks of Renault S.A.S. or its subsidiaries and are used with kind permission of Renault France