Crank sensor / TDC Sensor

Renault & Alpine General Discussion
User avatar
User

clee

Rank

Non Member

Posts

10431

Joined

Fri May 28, 2004 11:58 am

Location

Derbyshire


Has thanked: 54 times
Been thanked: 104 times

Postby clee » Thu Apr 28, 2011 11:43 am

no avatar
User

Alpineandy

Rank

Club Member

Club Member
Posts

2381

Joined

Mon Jun 14, 2004 8:37 am

Location

North Essex


Has thanked: 5 times
Been thanked: 10 times

Postby Alpineandy » Thu Apr 28, 2011 11:49 am

Alpine A110, Renault Safrane 2.5dt, Hudson Kindred Spirit (Renault powered), transAlp (Honda) and Ducati Multistrada
User avatar
User

jonc

Rank

Non Member

Posts

382

Joined

Mon Jul 16, 2007 11:08 am

Location

Oxfordshire


Has thanked: 24 times
Been thanked: 6 times

Postby jonc » Thu Apr 28, 2011 1:03 pm

Thanks guys.

<edit>
I also found this stuff at Merlin Motorsport. I reckon I'm going to have to get something like 20-30mm sleeving to get over the connector block!

http://www.merlinmotorsport.co.uk/HEAT-INSULATION-Thermal-Sleeve/c36_479/index.html

The red fire sleeving looks like what I have on the old sensor. More pricey especially as I'd have to get a large bore to fit over the connector.
Simon Taylor posted a photo of his a while back that had the silver thermal sleeving, so I'm thinking that that will be sufficient - and the reflective qualities may even be better.

Are the Car Builders' folks quick at delivering?
User avatar
User

simontaylor

Rank

Club Member

Club Member
Posts

5602

Joined

Thu Apr 15, 2004 12:33 pm

Location

Fleet, Hampshire


Has thanked: 44 times
Been thanked: 56 times

Postby simontaylor » Thu Apr 28, 2011 1:16 pm

Car builers are tops at deliver.
1986 : '86 GTA v6 BW-EFR turbo, with Adaptronic ECU
Firsts at
2007 : Gurston Down & RAOC Champion
2008 : Rushmoor & Eelmoor & ACSMC Hillclimb class Champion
2009 : Longcross & Eelmoor
2010 : Crystal Palace & Eelmoor
2016 : Rushmoor & 5th O/A
User avatar
User

Stunned Monkey

Rank

Non Member

Posts

1514

Joined

Tue Apr 12, 2005 12:24 am

Location

Nr Chippenham, Wiltshire


Has thanked: 0 time
Been thanked: 3 times

Postby Stunned Monkey » Thu Apr 28, 2011 5:17 pm

The biggie is: does it fix your problem :D

Try here for heatshielding

http://www.cbsonline.co.uk/category/Hea ... ing,b.html
Martin - PRV Tinkerererer
www.delorean.co.uk
User avatar
User

JohnC

Rank

Non Member

Posts

2120

Joined

Sun Dec 02, 2007 6:19 pm

Location

Jersey C.I.


Has thanked: 15 times
Been thanked: 83 times

Postby JohnC » Thu Apr 28, 2011 6:37 pm

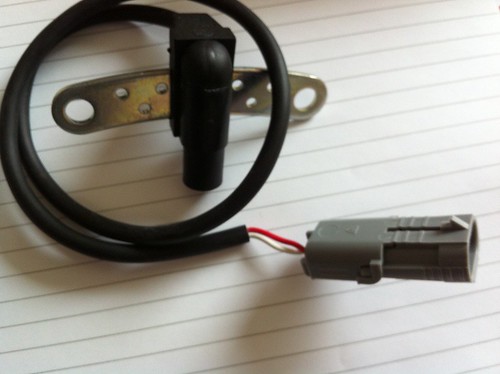
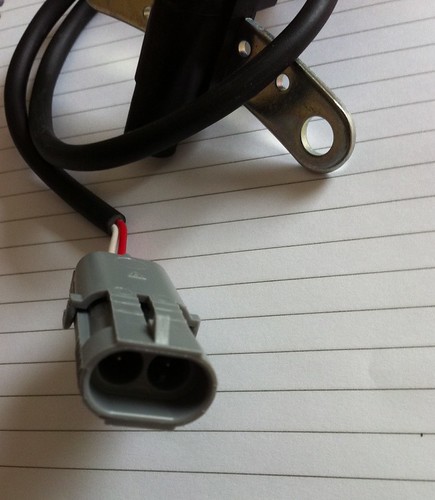
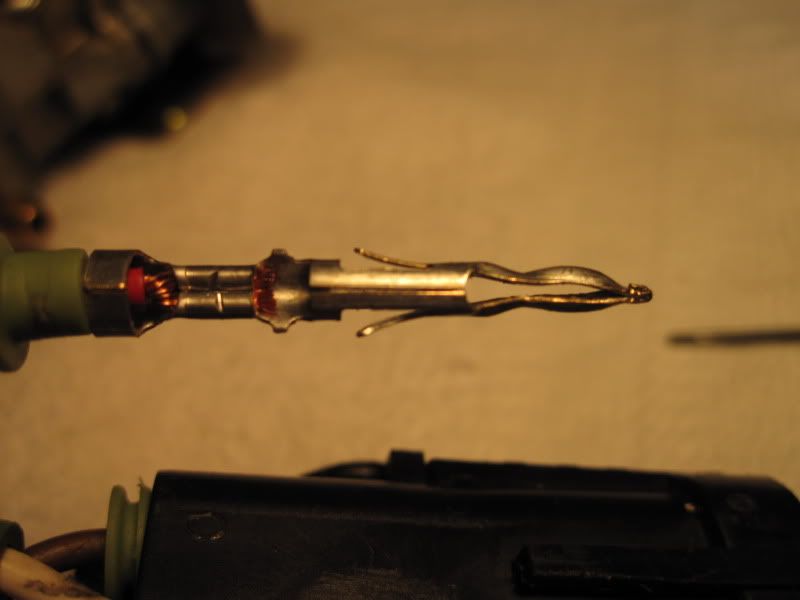
jonc wrote: With the connector block at one end and the sensor at the other there's no way (without cutting the wires) to get the old one onto the new one.

I have not seen this particular connector as to whether it is possible to remove the pins from the connectors body or not, but reading the thread, it sounds as if you have to reverse the wires anyway ..... how do you go about this without cutting them if the connector is non reversible which I suspect it is ?
I am not offering any suggestions, just interested :wink:
1990 GTA Atmo, 2003 Jaguar X type 2.5SE Auto, 2018 Kia Picanto GT-Line-S 1.25
User avatar
User

jonc

Rank

Non Member

Posts

382

Joined

Mon Jul 16, 2007 11:08 am

Location

Oxfordshire


Has thanked: 24 times
Been thanked: 6 times

Postby jonc » Thu Apr 28, 2011 6:44 pm

Stunned Monkey wrote:The biggie is: does it fix your problem :D

Try here for heatshielding

http://www.cbsonline.co.uk/category/Hea ... ing,b.html


That is the big question!
Time constraints and work have meant that I haven't had a chance to change it yet. The new sensor only arrived this morning and I've just ordered some heat sleeving to go onto it. I did manage to 'scope out the job' of changing it but work commitments will most likely mean that I'll have to get someone to do it for me. No idea how Clee got to it via the driver's side wheel arch - looks well fiddly. Also the workshop manual reckons that it's accessed from underneath - in a rather blase manner, it must be said.

Of course, when the car is cold, it all works just fine. The old sensor tests out at 200 ohms and the engine runs great. I'm pretty sure that if I take it anywhere it'll go again - adding a couple of hours to any journey! Once the sleeving arrives, I'll get it all fitted and let you know. That'll be an 'interesting' first trip after the new one is fitted.
If I'd known, I'd have got the RAC guy to test the resistance on the connector when it was dead - then we'd know for sure.
User avatar
User

clee

Rank

Non Member

Posts

10431

Joined

Fri May 28, 2004 11:58 am

Location

Derbyshire


Has thanked: 54 times
Been thanked: 104 times

Postby clee » Thu Apr 28, 2011 6:52 pm

JohnC .
The connectors are wired correctly but match red to white and vice versa .The problem only surfaces when either those connectors are fecked/chopped or you get a non #60 sensor .Logic would dictate that you connect red to red ....
This may be the reason that there is a 60 number for the Alp version .

I dunno ...all I know is what it is ....

little jonc :lol: .

It is a pain and does depend on arm length and hand size .I have a woman's hand :wink:
User avatar
User

JohnC

Rank

Non Member

Posts

2120

Joined

Sun Dec 02, 2007 6:19 pm

Location

Jersey C.I.


Has thanked: 15 times
Been thanked: 83 times

Postby JohnC » Fri Apr 29, 2011 8:39 am

Thanks Lee, I now know what you are all talking about :D .... what I would like to see however, is a pic of the actual connector, if anyone can spare a moment to post one up for me please.
1990 GTA Atmo, 2003 Jaguar X type 2.5SE Auto, 2018 Kia Picanto GT-Line-S 1.25
User avatar
User

jonc

Rank

Non Member

Posts

382

Joined

Mon Jul 16, 2007 11:08 am

Location

Oxfordshire


Has thanked: 24 times
Been thanked: 6 times

Postby jonc » Fri Apr 29, 2011 9:37 am

Here you go John. Some shots of the whole sensor (notably without any shielding) and the connector.

Note that there's a twist in the wires that's obscured in the front-on shot of the connector. Hope this gives you what you need.

Image
tdc_sensor_1 by Jonathan, on Flickr

Image
tdc_sensor_2 by Jonathan, on Flickr

Image
tdc_sensor_3 by Jonathan, on Flickr


[/img]
User avatar
User

JohnC

Rank

Non Member

Posts

2120

Joined

Sun Dec 02, 2007 6:19 pm

Location

Jersey C.I.


Has thanked: 15 times
Been thanked: 83 times

Postby JohnC » Fri Apr 29, 2011 9:50 am

Thanks Jon, it is as I thought, the pins can be removed, so if you wanted to slip some heat shielding tubing over the cables of the correct size, clearly removing the pins would achieve this. I you want info of how to get the pins out, let me know :wink:
1990 GTA Atmo, 2003 Jaguar X type 2.5SE Auto, 2018 Kia Picanto GT-Line-S 1.25
User avatar
User

jonc

Rank

Non Member

Posts

382

Joined

Mon Jul 16, 2007 11:08 am

Location

Oxfordshire


Has thanked: 24 times
Been thanked: 6 times

Postby jonc » Fri Apr 29, 2011 11:04 am

Thanks John.

I've order some sleeving that should fit over the connector, so hopefully that won't be required. But you never, know - I might be in touch!

Jon
User avatar
User

jonc

Rank

Non Member

Posts

382

Joined

Mon Jul 16, 2007 11:08 am

Location

Oxfordshire


Has thanked: 24 times
Been thanked: 6 times

Postby jonc » Tue May 03, 2011 11:24 am

Quick update:

Changed the thermostat yesterday and after running it with the 'stat open for about 12 minutes (better water temp behaviour, BTW), engine. TDC Sensor reading open circuit instead of 200 ohms.
That'll be the problem, then.

Just waiting for my heat shielding to arrive then hopefully back on the road!
no avatar
User

Jon K

Rank

Non Member

Posts

107

Joined

Sun Mar 20, 2011 9:24 pm

Location

Winchester


Has thanked: 0 time
Been thanked: 0 time

Postby Jon K » Wed May 04, 2011 12:08 pm

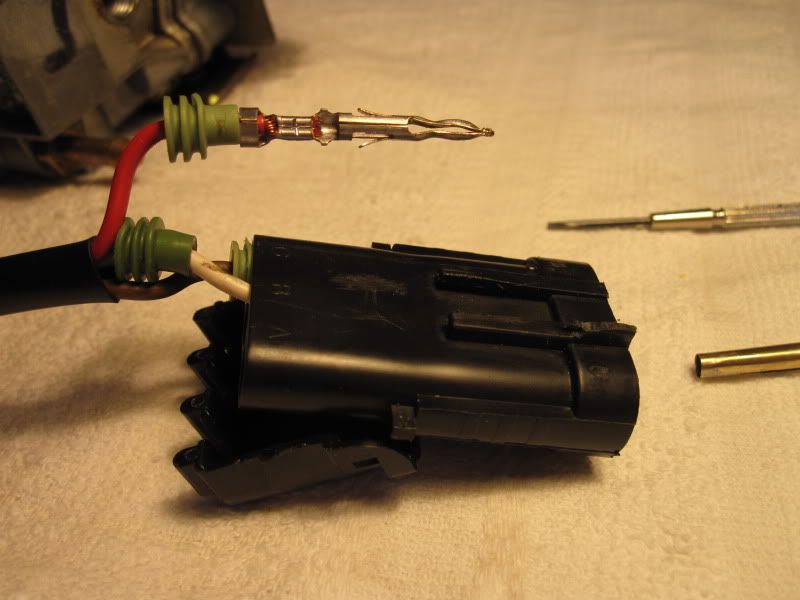
JohnC wrote:Thanks Jon, it is as I thought, the pins can be removed, so if you wanted to slip some heat shielding tubing over the cables of the correct size, clearly removing the pins would achieve this. I you want info of how to get the pins out, let me know :wink:


Hi John, If you have any information on how to take the pins out that would be great.

I am also changing my sensor and if I can swap the shield then I can throw it together tonight.
User avatar
User

JohnC

Rank

Non Member

Posts

2120

Joined

Sun Dec 02, 2007 6:19 pm

Location

Jersey C.I.


Has thanked: 15 times
Been thanked: 83 times

Postby JohnC » Wed May 04, 2011 4:23 pm

Hi Jon, no problem. First prise back the clips either side of the casing, and the rear cover should fold away from the main body revealing the wire entry points. There should be a rubber grommet around each wire which can be pulled out.
Next...see pics below... The actual pin has two barbs, and carefully, without damaging the actual pin, with a jewellers screwdriver or similar, press each barb into the pins body, then you can pull the pin out through the back of the connector. It is difficult to actually see the barbs down the tube, so to speak, but you can feel for them. If you look at the second pic, you can see where the barbs are in relation to the open sides of the pin, ie:- the barbs are at 90` from the open sides. You can easily see the open sides of the pin. It is a bit fiddly to do, but you don`t have to use much force. Clearly, all you have to do when replacing the pins into the connector, is reset the barbs as the pics below show.
I have used this method for years without too much trouble, but just recently, I have made a tool ( a tube really :lol: ) to slide over the pin, out of 4 thou` shim stock, which works a treat and saves all the fiddling.
Before you start, make sure you have a pic, or make a note of which colour wire goes to which side of the connector, the last thing you want is the wires reversed.
Once you get the hang of the first pin, you will find the other is easy. :wink:

Image

Image
1990 GTA Atmo, 2003 Jaguar X type 2.5SE Auto, 2018 Kia Picanto GT-Line-S 1.25
PreviousNext


  • Advertisement

Who is online

Users browsing this forum: Bing [Bot], Google [Bot] and 70 guests

Powered by phpBB ® | Renault' and 'Alpine' are trademarks of Renault S.A.S. or its subsidiaries and are used with kind permission of Renault France